
Master Institutional Supply and Demand Zones
Want to trade like the institutions? The gap between retail traders who struggle and those who consistently profit often comes down to one crucial skill — understanding where institutional money flows.
Supply and demand zones expose exactly where major players are entering and exiting the market. When you can identify these zones with accuracy, you’re no longer reacting to price — you’re positioning yourself ahead of it.
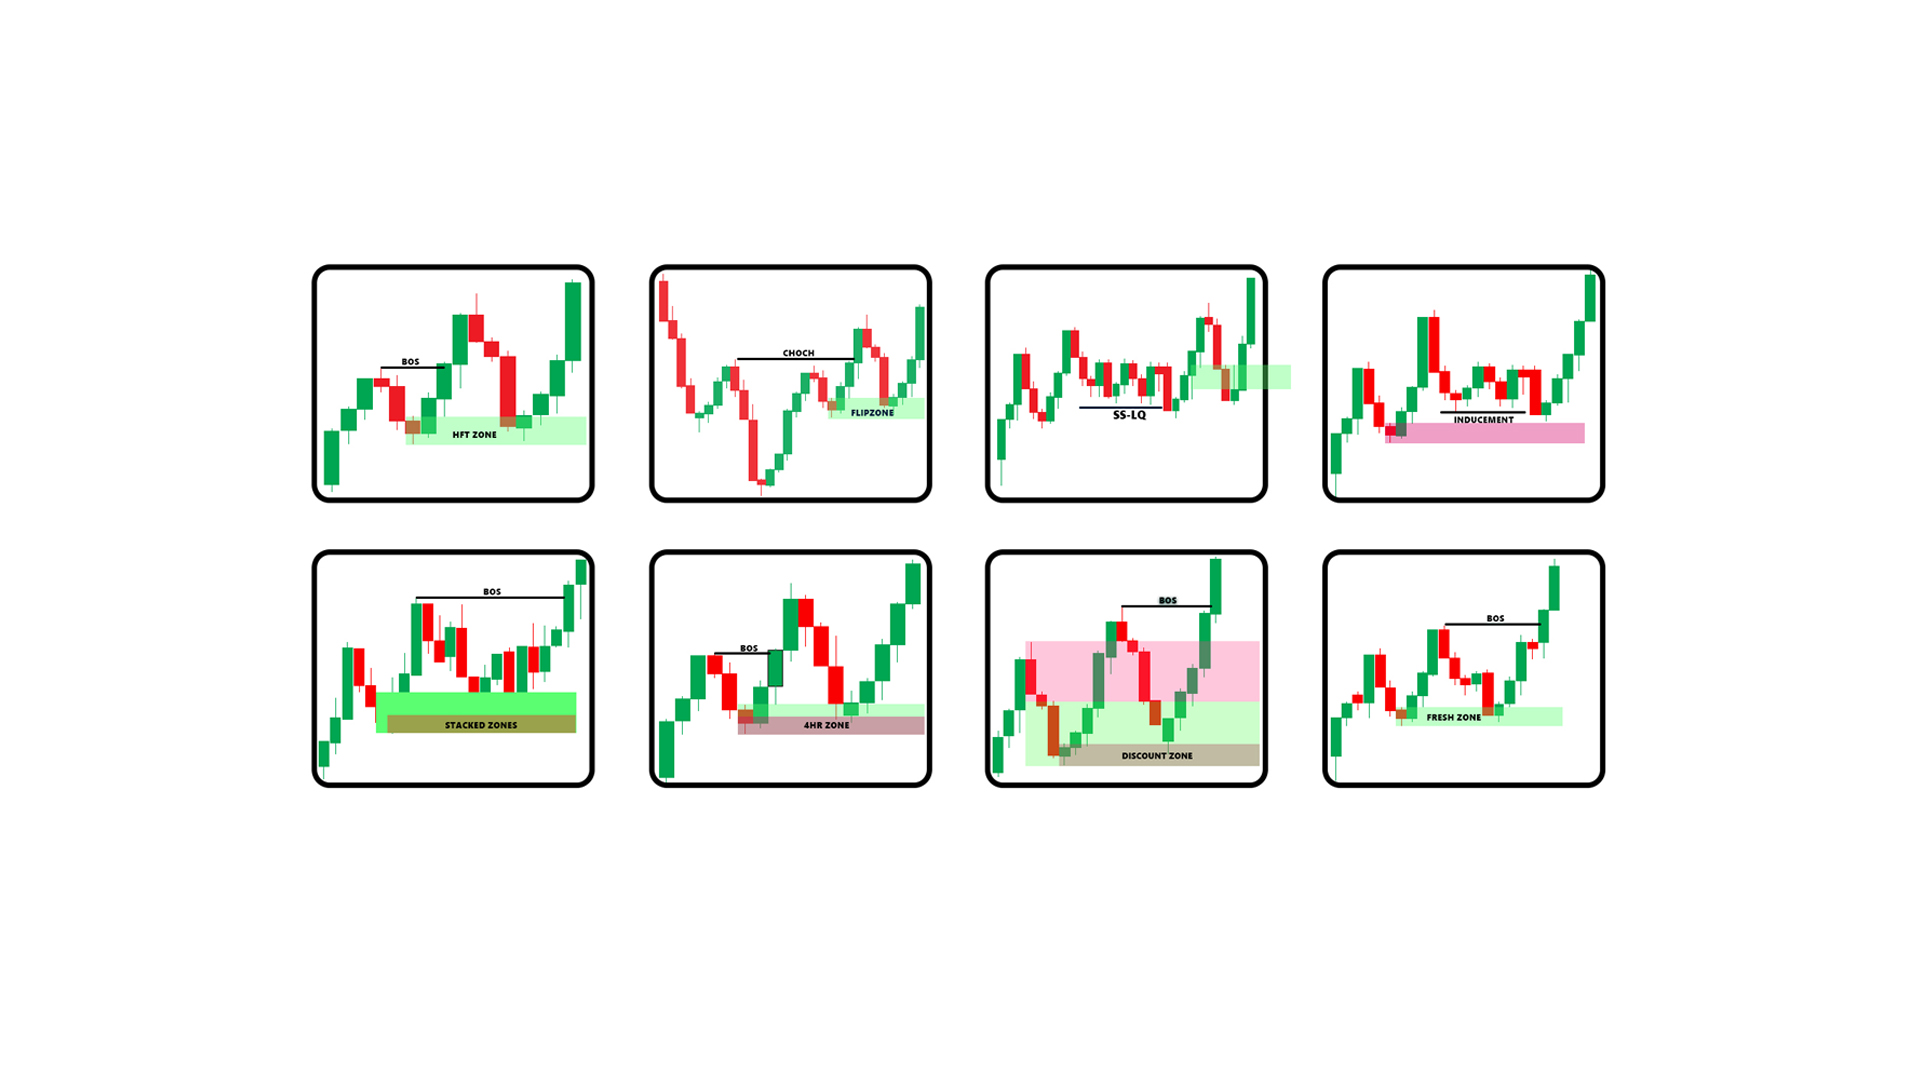
In this guide, we’ll break down the eight essential rules institutional traders use to spot high-probability supply and demand zones. These aren’t just textbook theories — they’re real-world, battle-tested strategies that can completely change the way you read price action and plan your trades.
No matter what you trade — forex, stocks, or crypto — these principles apply universally. Learn to see what institutions see, and you’ll start trading with clarity and confidence.
📍 Ready to uncover how the smart money really trades? Let’s dive in.
Table of Contents
Why Supply and Demand Zones Matter More Than You Think
Understanding Institutional Supply and Demand Zones
Grasping the concept of Institutional Supply and Demand Zones is crucial for traders aiming to align with market movements driven by large institutions. These zones signify areas where significant buying or selling interest has been established, leading to potential price reversals and trading opportunities.
Before we dive into the rules, it’s important to understand why supply and demand zones are so powerful in trading. Unlike ordinary support and resistance levels, these zones highlight real areas of imbalance between buyers and sellers — places where institutional traders such as banks, hedge funds, and large financial institutions have entered or exited massive positions.
When these big players make their moves, they leave visible footprints in the market. Price doesn’t just react randomly — it reacts because of institutional order flow. Once you learn to read these footprints, you’ll stop guessing and start trading with precision.
Think of it this way: supply and demand zones aren’t just arbitrary rectangles drawn on your chart. They represent pockets of institutional activity — where serious money has already proven it can move the market. Recognizing these zones gives you an undeniable edge: instead of reacting after the fact, you’ll be anticipating where price is most likely to turn next.
Rule 1: The Zone Must Lead to a Break Of Market Structure
Here’s where most traders go wrong — they mark every little consolidation as a potential supply or demand zone. But not all zones are created equal. The first and most critical rule is simple:
👉 A valid supply or demand zone must lead to a clear break of market structure (BOS).
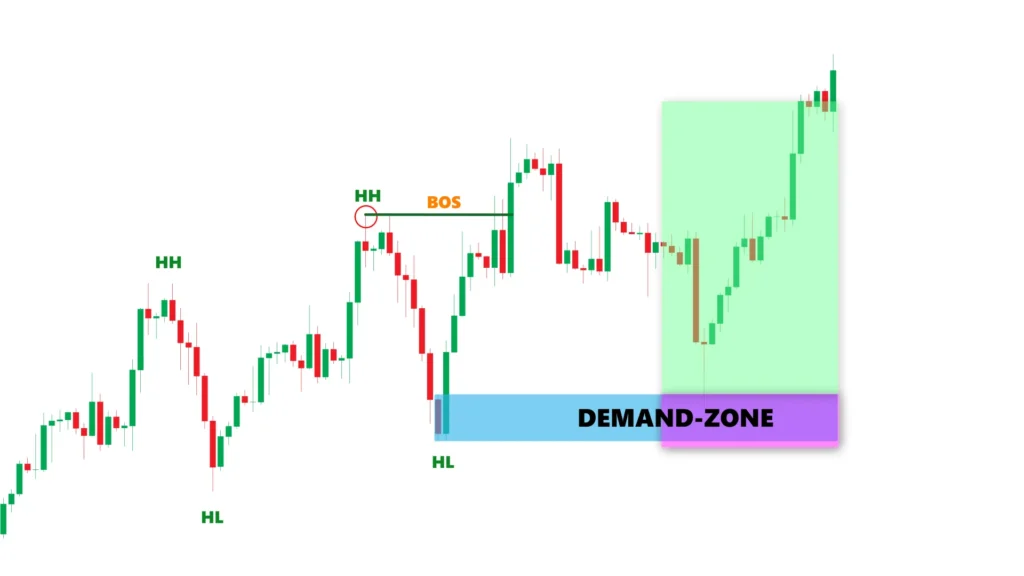
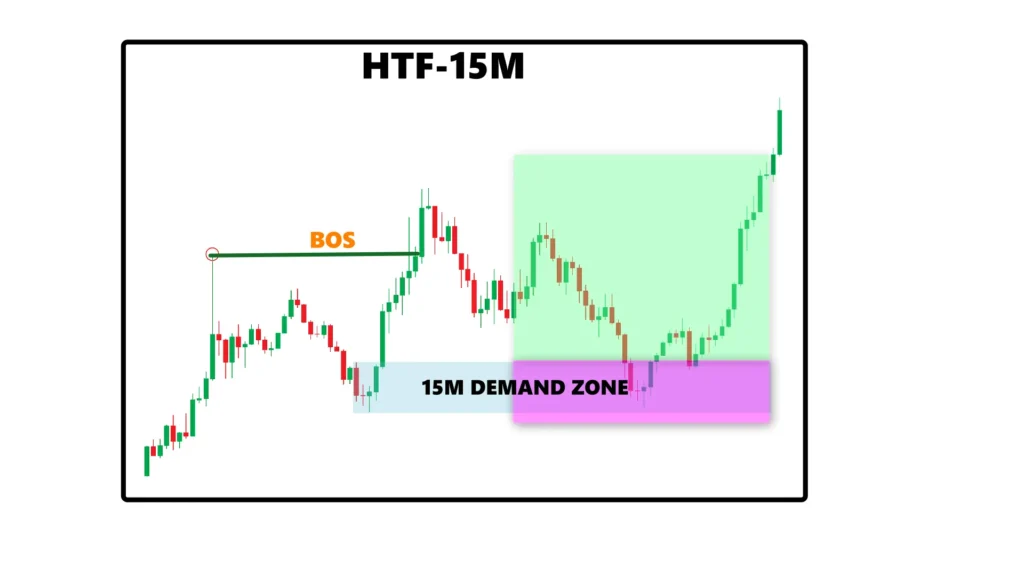
When the market is trending upward — printing higher highs and higher lows — pay attention to the moment price breaks above a previous swing high. That’s your BOS. It’s not random volatility; it’s a powerful sign that institutional volume just entered the game.
So, the next step is detective work.
Ask yourself: Where did that move begin?
That origin point — where buyers stepped in with enough force to break structure — is your demand zone. It’s a price level backed by big money. And because institutional orders don’t execute instantly, those levels often remain active for future reactions.
How to Apply This in Real Trading
When you spot a break of structure, don’t chase the move. Retail traders often jump in late, right when the institutions are taking profits. Instead:
- Mark the origin zone of the impulse move.
- Wait patiently for price to return to that zone.
- Look for confirmation — like rejection wicks, imbalance fills, or a fractal CHoCH on the lower timeframe.
- Enter with the institutions, not against them.
This method gives you timing, precision, and context. Remember — it takes real volume for price to break structure. So, when you see that move, you’re literally watching institutional power in motion. That’s your high-probability setup zone.
Rule 2: Flip Zones — When Supply Turns into Demand

Flip zones are a game-changer in trading once you understand them. In simple terms, a level that once acted as supply can flip to act as demand, or the reverse. This happens when the market dynamics shift at a particular price point, signaling a potential trend reversal.
Understanding Flip Zones
Imagine this scenario: the market is initially dominated by supply. Price reaches a level and is pushed down sharply. Later, price revisits that same area. Supply attempts to hold again—but fails.
That failure is crucial. Why? Because demand steps in, absorbs the selling pressure, and pushes the price higher.
This is what we call a flip zone. What was once a supply zone now acts as a demand zone, making it a high-probability area for long trades.
The Battle Between Buyers and Sellers
It’s important not to assume a flip zone has occurred. You need to see a clear battle: supply tries to dominate but fails, and demand takes control. Once confirmed, you have a tradable setup.
Example in Action
- The market is in a downtrend; supply is in control.
- Price breaks structure downward, forming a new supply zone.
- Price returns to the supply zone and attempts to push lower but fails to break the previous low.
- Demand steps in, flipping the zone, and price starts moving upward, breaking structure to the upside.
When this pattern unfolds, mark the zone. On the next pullback, with proper confirmation, this becomes a high-probability entry point.
Flip zones are powerful because they highlight where market sentiment shifts—from bearish to bullish or vice versa—giving traders an edge in anticipating price moves.
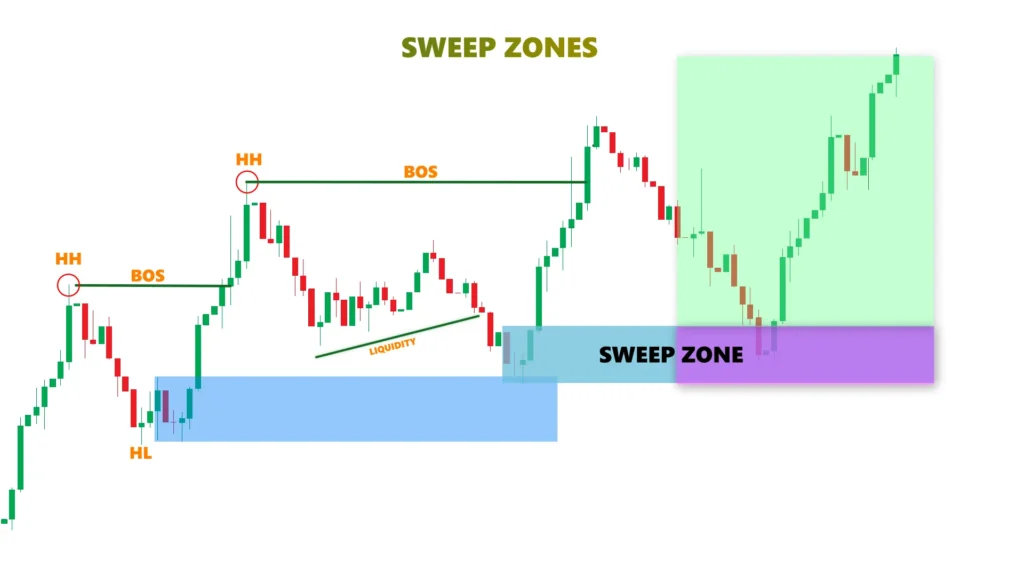
Rule 3: Sweep Zones — Where Institutions Hunt Liquidity
Sweep zones expose one of the most advanced tactics institutional traders use: liquidity hunting. Understanding this concept can completely change how you interpret certain price movements that often trap retail traders.
How Sweep Zones Work
Here’s the scenario: the market is trending upward, but during a pullback, you notice a series of equal lows forming. Why is this important? These equal lows are often where retail traders place their stop-losses. And remember—stop-losses are just sell orders waiting to be triggered.
Institutions need liquidity to enter large positions without causing slippage. Those clusters of stop-losses are a perfect liquidity pool. So what happens? Institutions push price down just enough to trigger those stops, flooding the market with sell orders. Once liquidity is captured, they step in with massive buying power, causing a sharp price reversal.
Identifying and Trading Sweep Zones
The key pattern is:
- A quick dip below equal lows (or above equal highs in a downtrend)
- Followed by an immediate reversal
This signals a sweep in action.
But here’s the crucial part: don’t jump in immediately after the sweep.
- Wait for price to break above the previous high (in an uptrend) to confirm momentum is returning in the trend direction.
- Mark the zone where the sweep occurred.
- When price revisits this area and shows a positive reaction, that becomes a high-probability entry point.
This approach works consistently because you’re aligning with institutional behavior instead of fighting it. Essentially, you’re following the smart money once they’ve secured the liquidity they needed.
Rule 4: Inducement — The Liquidity Prerequisite

Inducement is a critical concept that helps traders avoid falling into false zones. The idea is simple: for a zone to be valid, there must be liquidity present. Institutions don’t move price randomly—they need enough stop-losses, buy orders, or sell orders to trade against.
How Inducement Works
Let’s look at a practical example:
- Price moves upward and then pulls back, creating a small low.
- Early buyers enter at this level, unintentionally building sell-side liquidity beneath the low—meaning their stop-losses cluster there.
- When price pushes through, capturing that liquidity, that’s inducement in action.
In essence, inducement tricks retail traders into acting too soon, stops them out, and then the institutional demand or supply drives the real move.
The Critical Question: Is There Liquidity?
Before acting, always ask: is there enough liquidity to grab here?
- Look for equal highs or lows.
- Identify clusters of likely stop-losses.
- Spot obvious areas where retail traders would enter positions.
If you can’t find these, the zone likely won’t hold—price may simply blast through it.
Why Inducement Matters
Inducement often precedes major institutional moves. Institutions use these liquidity grabs to fill large orders at optimal prices without slippage. Once the liquidity is secured, the true directional move begins.
When you see price:
- Drop just below a minor low, sweeping stops
- Immediately reverse with strong momentum
…that’s not random. It’s institutions accessing liquidity.
Patient traders gain an edge by waiting for the liquidity grab to finish, then entering in the same direction as the institutional move. This aligns you with the smart money and increases trade probability.
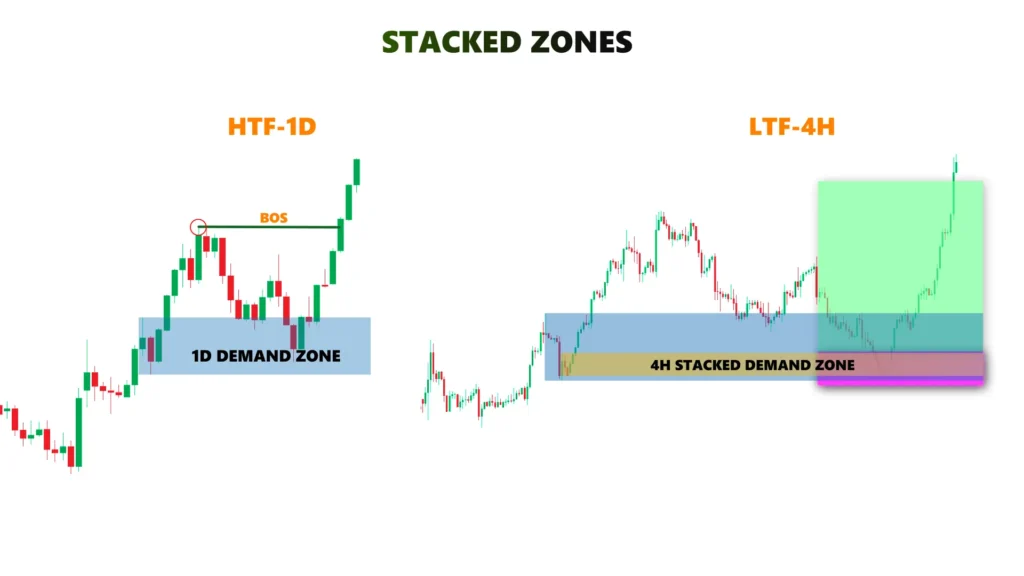
Rule 5: Stacking Zones Across Multiple Timeframes
This is where your trading analysis becomes exponentially more powerful: stacking zones across different timeframes.
When you spot a demand zone on a higher timeframe (like the 4-hour or daily chart) and notice another zone forming in the same area on a lower timeframe (like the 15-minute or 1-hour chart), you’ve discovered what traders call stacking.
Why Stacking Zones Works
Institutions and large market players typically operate on higher timeframes. A lower timeframe zone aligning with a higher timeframe zone signals the convergence of both short-term and long-term order flow.
This alignment creates a powerful setup because it shows where both retail and institutional interest intersect—often resulting in strong price reactions.
The Confluence Multiplier
Think of it this way:
- A single timeframe zone indicates institutional interest.
- A stacked zone, where multiple timeframes converge, indicates compounded institutional interest.
The more confluence there is, the higher the probability that price will react strongly when it revisits that level.
How to Trade Stacked Zones
- Start on higher timeframes: Identify major supply or demand zones.
- Zoom into lower timeframes: Look for zones forming within or near those higher timeframe zones.
- Mark the overlapping area: This is your stacked zone, where multiple layers of institutional orders are resting.
The result? Higher probability trades, stronger price reactions, and a clear edge over traders who only watch a single timeframe.
Rule 6: Alignment with Higher Timeframe Direction

This rule is crucial and can save you from countless losing trades: the more timeframes that agree, the higher the probability your trade will succeed. Essentially, you’re stacking the odds in your favor by ensuring your trade aligns with the bigger picture.
The Common Trader Trap
Here’s a scenario that often misleads traders:
- On the 5-minute chart, you spot a clean bearish trend and think, “This looks like a perfect sell setup.”
- But when you zoom out to the 15-minute chart, the picture changes. Price is actually bullish on the higher timeframe and is simply testing a strong demand zone at a significant 15-minute low.
Acting on the lower timeframe signal alone would put you against the bigger flow of capital, often resulting in a loss.
Why Higher Timeframes Matter
Higher timeframes carry more weight because they represent larger institutional orders and more traders. If your lower timeframe setup contradicts the higher timeframe trend, you’re essentially fighting the smart money, which rarely ends well.
Multi-timeframe analysis allows you to:
- Avoid false signals
- Reduce unnecessary losses
- Stay aligned with institutional moves
When charts like M5, M15, and 1-hour all point in the same direction, you’re observing real momentum backed by institutional volume.
Practical Takeaway
Before entering any trade based on a lower timeframe signal:
- Check the higher timeframe trend.
- If it aligns, enter with confidence.
- If it contradicts, wait for clarity or skip the trade entirely.
This discipline ensures you’re trading with the market, not against it, dramatically improving your probability of success.
Rule 7: Well-Priced Zones — The Discount and Premium Concept
Entry price matters far more than most traders realize. This rule emphasizes taking trades at the best possible levels, which dramatically improves your risk-to-reward ratio.
Understanding Discount and Premium Zones
The concept is simple yet powerful:
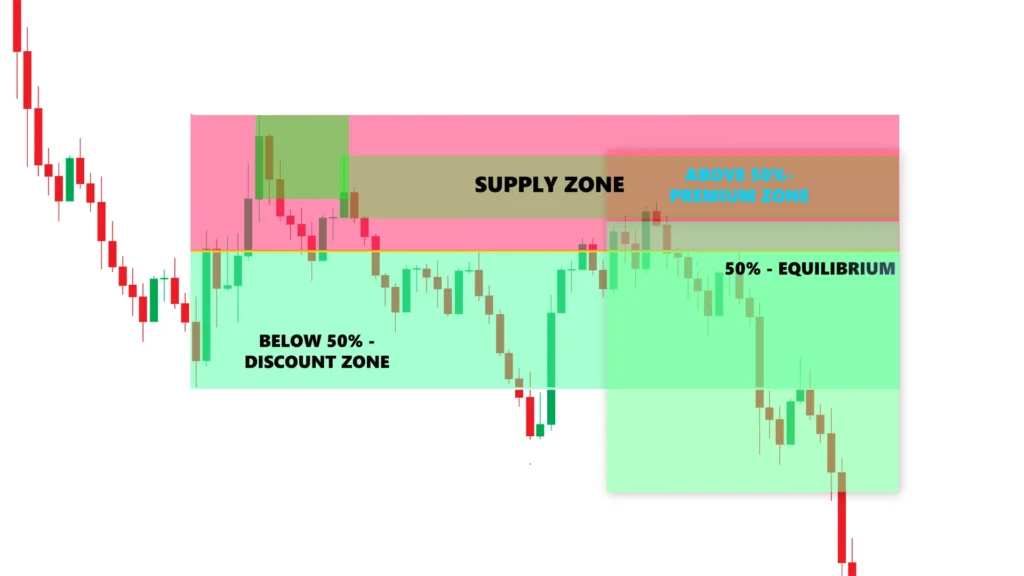
- Demand zones: Buy in the bottom 50% of the range. Price is considered discounted—essentially “on sale”—and institutions are most likely to step in here.
- Supply zones: Sell in the top 50% of the range. Price is considered premium, and sellers become active.
By entering at well-priced levels, you align your trades with institutional behavior and maximize your potential profits.
The Strategic Advantage
Why does this approach work so effectively?
- Better risk-to-reward ratios
- Buying low or selling high allows for tighter stop-losses while giving more room for profit.
- Syncing with institutional order flow
- Institutions accumulate in discount zones and distribute in premium zones.
Practical Application
- Downtrend: Wait for price to pull back to premium levels (upper half) before selling.
- Uptrend: Wait for price to retrace to discounted levels (lower half) before buying.
The discipline to wait for well-priced entries separates consistent traders from those who chase price, often ending up with poor setups. Following this rule increases your edge, reduces risk, and improves trade quality.
Rule 8: Fresh Versus Mitigated Zones
The final rule focuses on zone quality—a key factor in deciding which zones deserve your attention. Simply put, fresh zones are far more powerful than mitigated ones.
Understanding Fresh Zones
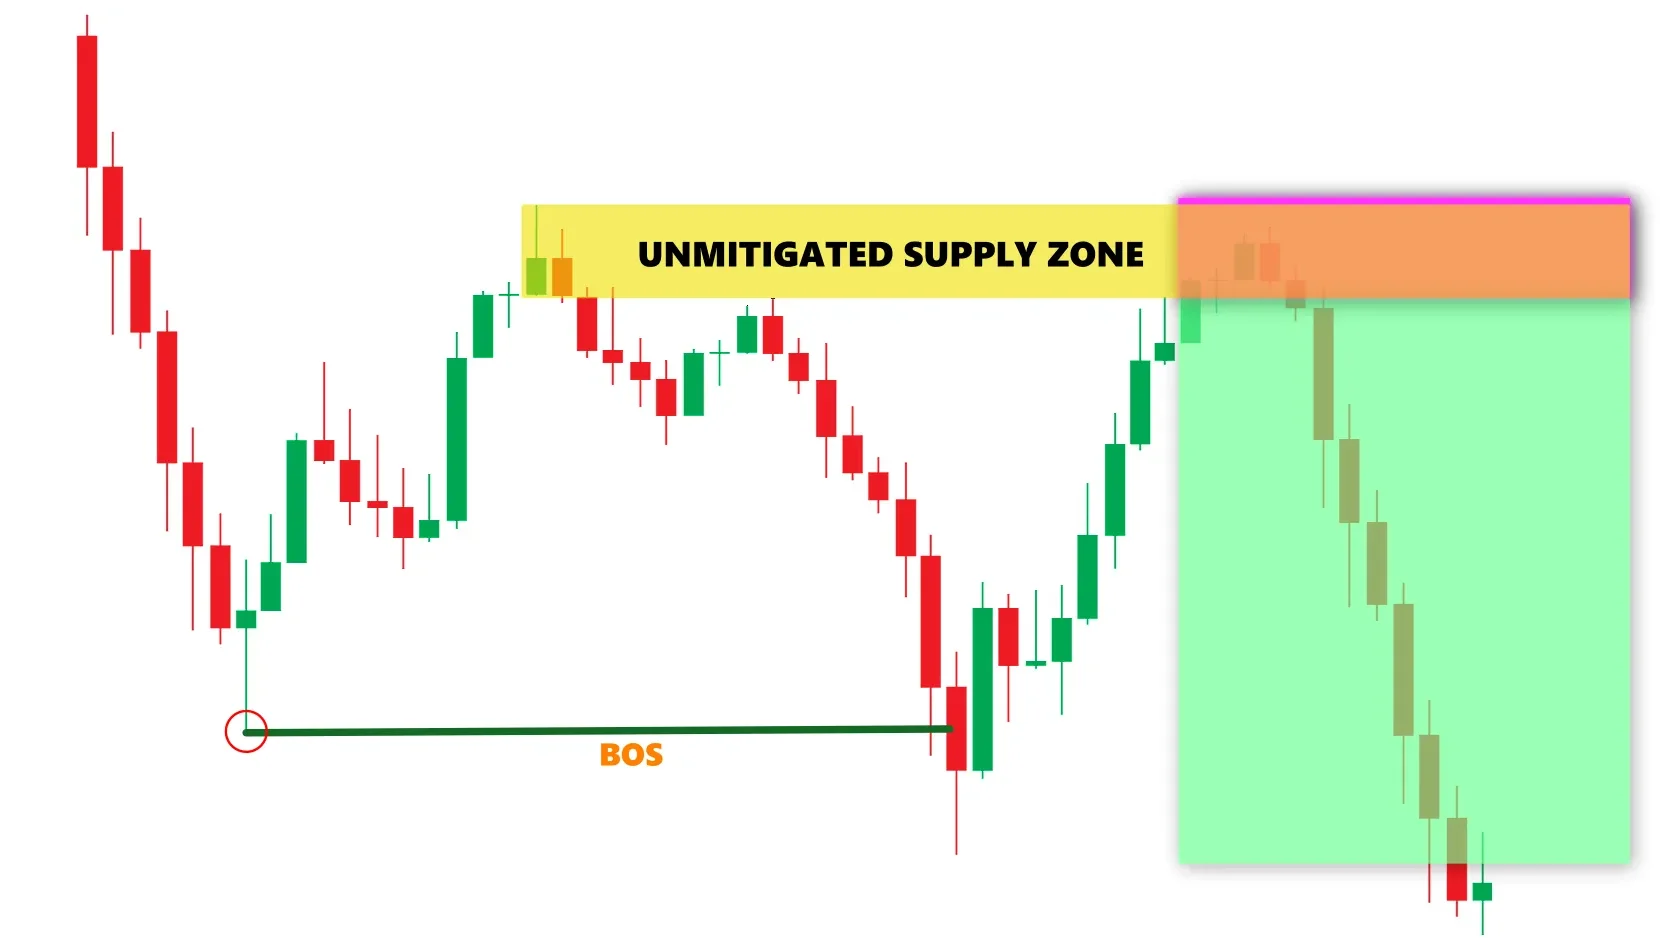
A fresh zone (also called an unmitigated zone) is one that hasn’t been touched since it was formed.
- In a downtrend, when price creates a new supply zone that hasn’t been tested yet, it’s considered fresh.
- This matters because the original institutional sell orders are still intact and waiting to be filled.
When price returns to a fresh zone, these resting orders are likely triggered, producing a sharp, aggressive move away from the zone. The reaction tends to be decisive because the full force of institutional interest is present.
The Degradation of Zones
Contrast this with a zone that has been tested multiple times:
- Each time price revisits the zone, some institutional orders are filled and disappear from the market.
- After several touches, the reaction weakens.
- Eventually, the zone may break entirely due to insufficient order flow to defend it.
Practical Takeaways
- Prioritize fresh zones for high-probability setups.
- Combine fresh zones with the other seven rules: structure breaks, multi-timeframe alignment, inducement, well-priced entries, etc., to maximize trade probability.
- Mitigated zones can still offer opportunities, but your expectations and risk should be lowered accordingly.
- The strongest reactions almost always come from zones being tested for the first time.
Putting It All Together: Trade Management Essentials
Understanding the eight rules is only half the battle. The other half is executing trades properly once you’ve identified a valid zone. Let’s break down the complete trade management process.
Three Reliable Entry Methods
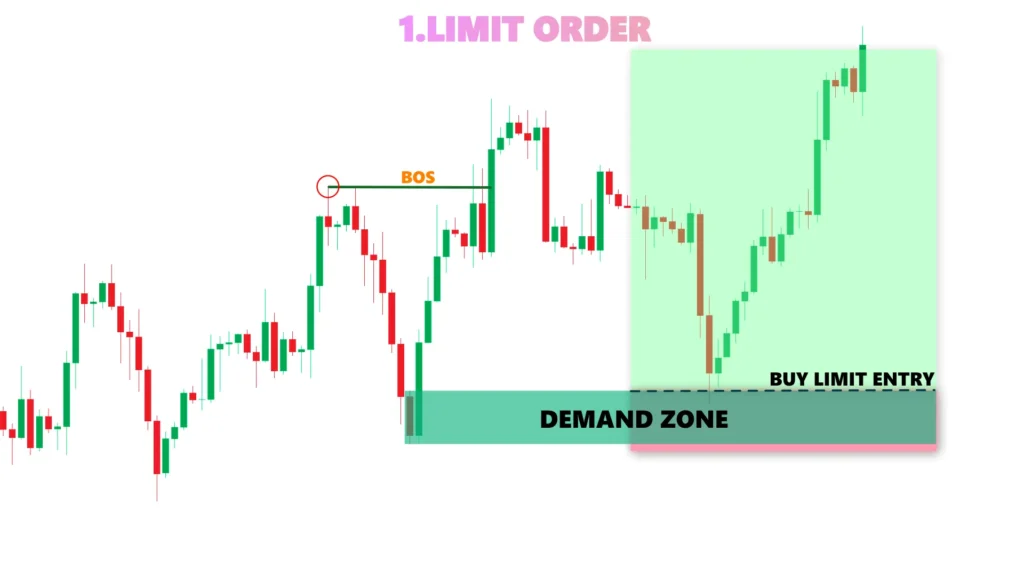
1. Limit Order Entry: This is the most straightforward approach. Place a buy limit at a demand zone or a sell limit at a supply zone. You get the best possible price, but there’s no confirmation. This means higher risk but also higher reward potential. Use this method when the zone aligns with the higher timeframe trend and shows strong imbalance characteristics.
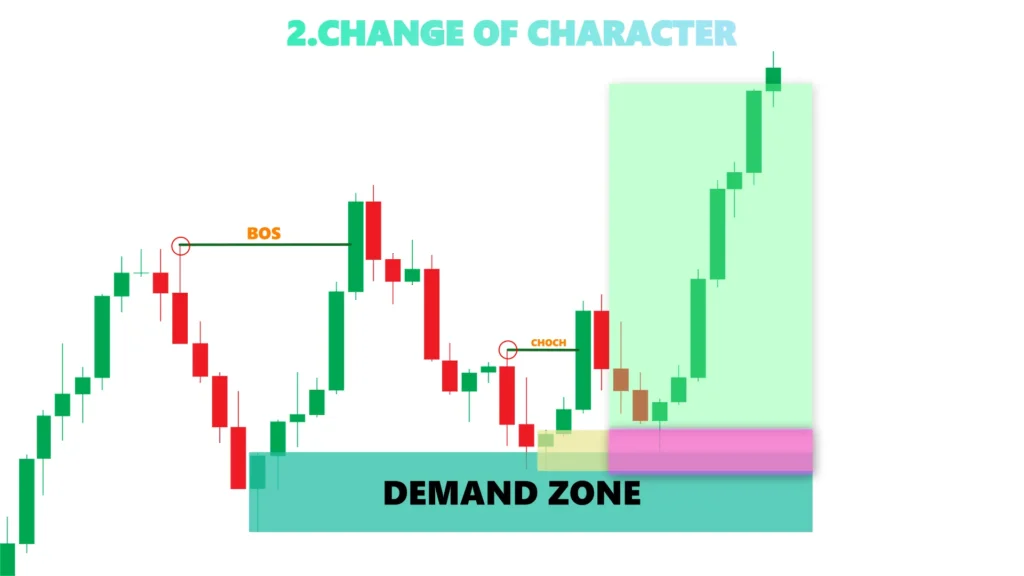
2. Change of Character (CHoCH): This method provides confirmation. After price pulls back into your zone, wait for a clear shift in structure on a lower timeframe. That structural shift is your signal that the zone is holding. Once you see it, identify the low (in an uptrend) or high (in a downtrend) that caused the shift and enter at that level. Place your stop just beyond that structure point. This method increases probability while keeping risk tighter.
3. Liquidity Sweep Plus Structure Shift: This is the most refined method. Price takes out equal lows or equal highs, sweeping liquidity, then immediately reverses. Once that reversal breaks structure or shows a change of character, you have strong confirmation that institutions just entered. That’s your signal to follow. This approach aligns you perfectly with institutional behavior.

Stop Loss Placement
If you’re using a limit order entry, place your stop just beyond the extreme of the zone. This gives the trade breathing room while protecting against the zone failing. If you’re using confirmation entries like break of structure or change of character, you can tighten your stop significantly. Place it just below the low (or above the high) that triggered your entry signal. This improves your risk-to-reward ratio substantially and limits unnecessary losses.

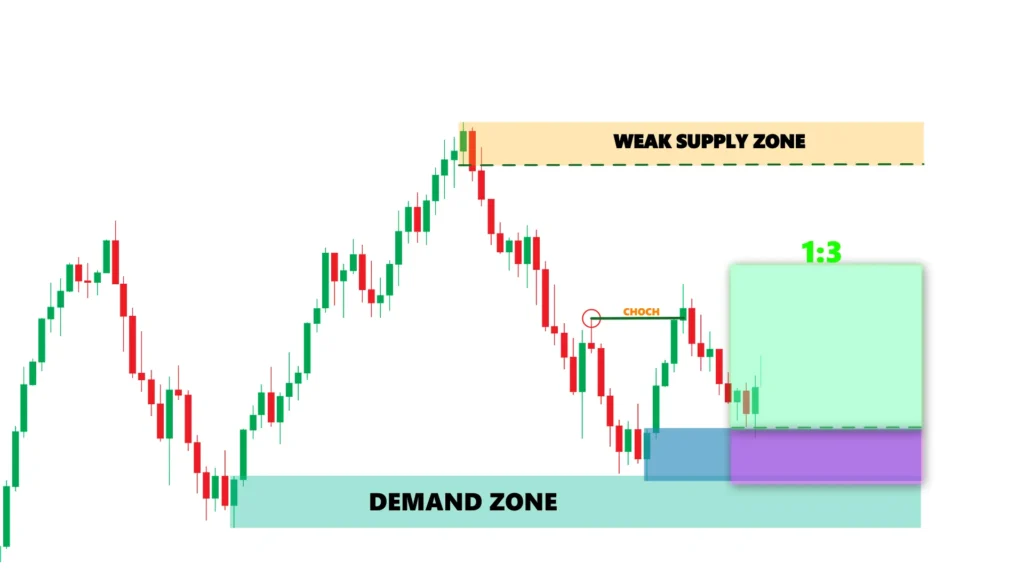
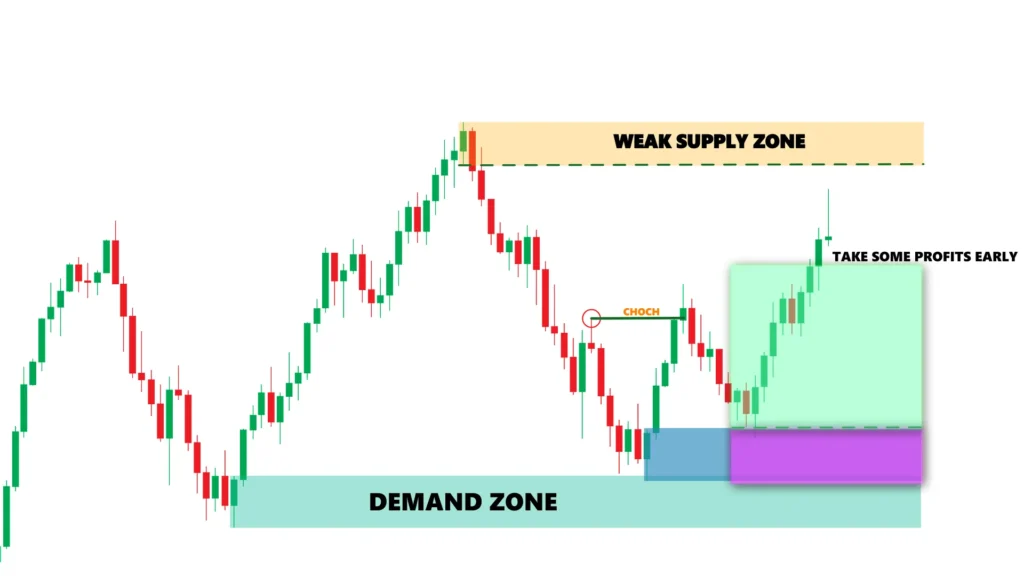
Take Profit Strategies
Keep your exit strategy simple with three solid options
First, target the next opposing supply or demand zone—areas where price is likely to encounter significant resistance or support. Second, use a fixed risk-to-reward ratio like 1:3 or 1:4 to maintain consistency across all your trades. Third, scale out of positions—take partial profits early to lock in gains while letting the remainder run toward larger targets. This approach balances guaranteed profits with the potential for larger wins.
The Institutional Trading Mindset
What separates institutional traders from retail traders isn’t just capital—it’s approach. Institutions think in terms of probabilities, not certainties. They combine multiple confirming factors before entering trades. They understand that individual trades don’t matter; what matters is the statistical edge over dozens or hundreds of trades.
By applying these eight rules consistently, you’re adopting that institutional mindset. You’re not gambling on random support and resistance lines. You’re identifying where genuine institutional money has moved the market and positioning yourself to trade alongside them.
Final Thoughts: Mastery Through Practice
These eight rules provide a comprehensive framework for identifying high-probability supply and demand zones. But knowledge alone isn’t enough—you need to apply these concepts consistently across different market conditions.
Start by backtesting these rules on historical charts. Mark zones according to the criteria we’ve discussed and see how price reacted when it returned to them. You’ll quickly develop pattern recognition for what valid zones look like versus false ones.
Then move to forward testing with a demo account or very small position sizes. Track which rule combinations produce the most reliable setups for your trading style and timeframes. The goal is building confidence through experience.
Remember: institutional traders didn’t develop these sophisticated approaches overnight, and neither will you. But by understanding where big money flows and how to position yourself accordingly, you’re already thinking several steps ahead of the average retail trader.
The market will always have supply and demand dynamics at play. Your job is to identify where those dynamics are strongest and trade with the institutions, not against them. Master these eight rules, combine them with disciplined risk management, and you’ll have a framework that works across all markets and timeframes.

nice bro
Thanks Bro